
This is an old revision of the document!
Table of Contents
Automating Point of Sale Data on WebFronts Sites
Getting Stared with The WebFronts App
The WebFronts App is the content management system that retailers use to manage their WebFronts website. Through the WebFronts App, retailers control pricing, which items to show, promotional content, and all other aspects of their sites. Retailers with a Level 3 or Level 4 WebFront also have full customization capabilities for the HTML and CSS of their sites. In many cases, a retailer's dedicated Account Manager will make changes on the retailer's behalf, especially for complex configurations.
In the WebFronts App, most configuration is done via the Edit Prices screen. Conceptually, the Edit Prices screen is modeled like a spreadsheet. Each row is a product, and each column is some value associated with each product, e.g. show on site, sale price. Retailers can set a single value that applies to every item (“fill the column”) or set a unique value for each cell in the table.
WebFronts has a number of standard columns predefined, but users can also define “custom columns”, which can contain any data the retailer enters. The retailer (or their Account Manager) can then add dynamic content to the site based on the values in those custom columns. For example, there might be a banner that shows on items with “Low Stock” or “Available at the Wichita location”. This is how Point of Sale (POS) data - e.g. inventory or pricing - can be added to retailers' sites.
At a high level, the process looks like this:
- Define one custom column for each unique value that will be imported into WebFronts
- e.g. Inventory for Location A, Inventory for Location B
- Configure the Auto Import URL(s) (see below) to upload data for all POS columns
- Configure the retailer's POS system to upload data to WebFronts on a regular basis, e.g. daily or hourly
- The retailer contacts their dedicated WebFronts Account Manager to use this data on their WebFronts site
Setting Up Your WebFronts Test Account (for POS Vendors)
- Wait for an RWS employee (likely Jeff Dezso) to create a sandbox account
- Create an account with your email address
- Use the billable account name and password provided by RWS to link your user account with your billable account, e.g.
- Master Account Name: SANDBOX_YOUR_POS
- Master Account Password: ABCxyz123
Once you are set up as the “Owner” of the sandbox account, you can add other users to your account (no limit). You will also have full access to The WebFronts App for your account so you can test your integration.
Sending Data to WebFronts
WebFronts has a rich system for importing data from CSV files. For users, there is a “wizard” in the WebFronts App (Tools > Import from Excel) that guides them through the decisions that need to be made:
- Which column in the CSV file contains the RWS model number (used to match rows)?
- Which column in the CSV file contains the RWS brand code? This is used to distinguish between identical model numbers in different brands. This selection is optional but highly recommended.
- Which column(s) in the CSV file are being imported into which WebFronts column(s)?
- Should the data currently in the WebFronts column(s) be completely erased before importing the data from the CSV file?
For those who want to automate this process (i.e. POS integrators), the wizard also generates a “magic URL” that can be used to send data programatically. This URL captures all the selections made in the wizard as well as a unique API key, which gives integrators permissions to upload files outside the WebFronts App.
The “magic URL” can be found on Step 4 of the wizard. At the bottom of the page, there is a link, Want to do this with a script?:
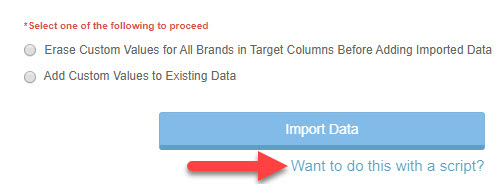
Clicking on that link will bring up a dialog with the “magic URL” as well as basic instructions for how to use it.
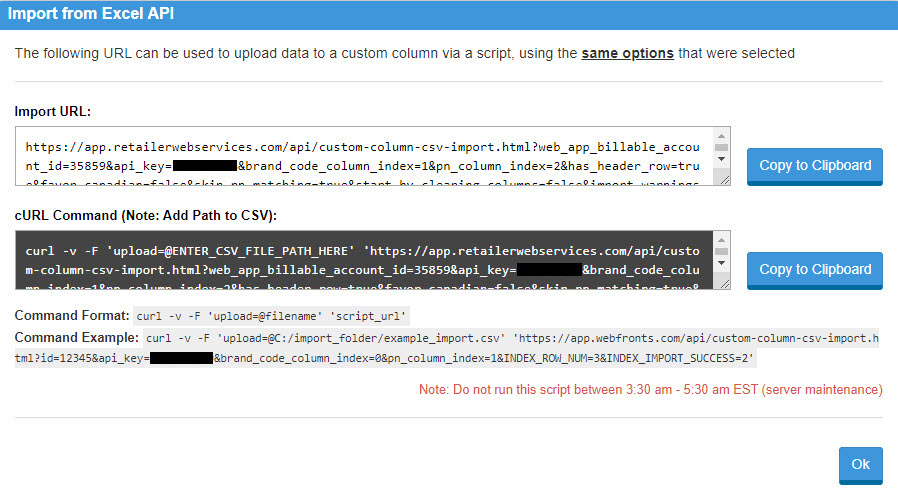
In short, integrators must send an HTTP POST to the “magic URL” with the CSV file to upload in the HTTP body as form data (name=upload). When a properly formatted and authorized request is received, the data in the attached CSV file is immediately imported into the WebFronts account and published to the site. Any errors will be noted in the JSON response.
!! Important Notes !!
When a user is making changes in the account, programmatic uploads will not post to the site immediately. Instead, they will be queued and published when the user publishes the rest of their changes.
A single CSV file can contain data for any number of WebFronts columns. Uploads are processed more quickly when a file contains multiple columns vs uploading each column in a separate CSV.
Programmatic uploads should be limited to one per store location per hour per account. Send all updates for the hour in a single file. If possible, update all columns in the same upload.
Getting Data from WebFronts
WebFronts has APIs that provide access to all the columns in The WebFronts App as well data on orders placed on WebFronts sites. If you are a POS vendor and are interested in getting access to these APIs, please contact Jeff Dezso for more information.
Pricing
All APIs use the retailer's domain plus a common URI as the endpoint. The PW URL argument acts as an API key, and can be provided by the retailer or an RWS employee.
Example Pricing API URL
https://demo12345.appliances.dev.rwsgateway.com/_CGI/pricing_only_specs.zip?PW=987654321
You will get an XML file with all columns visible in WebFronts, including code, description, formula, and computed value.
Querying the Pricing API
You can also query for only certain models from the WebFronts pricing API. Here's an overview of some of the search options. The full search API is too large to document here. If you have specific use cases, please bring them to Jeff Dezso, and he will help you find the best approach.
Orders
Pricing API
https://demo35859.appliances.dev.rwsgateway.com/_CGI/pricing_only_specs.zip?PW=-1911941970
That link will download everything - not necessarily what you want. To download all items for just one brand, you can add the URL param “MAN={CODE}”. For example
Only Ashley Products https://demo35859.appliances.dev.rwsgateway.com/_CGI/pricing_only_specs.zip?PW=-1911941970&MAN=ASHLEY
Only Coaster Products https://demo35859.appliances.dev.rwsgateway.com/_CGI/pricing_only_specs.zip?PW=-1911941970&MAN=COASTER
You can also download the prices for a single model like this.
With RWS Item Key https://demo35859.appliances.dev.rwsgateway.com/_CGI/pricing_only_specs.zip?PW=427532858&KEY=BRTWD:126237
Lookup by PN https://demo35859.appliances.dev.rwsgateway.com/_CGI/pricing_only_specs.zip?PW=427532858&KEY=126237
Note: This may return multiple models. They will be sorted by “best match”